Skema Modul Relay Arduino Terbaru Skema Diagram
Victoria Arduino Black Eagle for sale in Warsaw, Mazowieckie, Poland. USD 12,000.00 For sale Victoria Arduino Black Eagle Gravimetric 2 Group used. - Price $ 12,000 + VAT + Shipping cost. - Price negotiable - Purchased in November 2016. - Completely functional
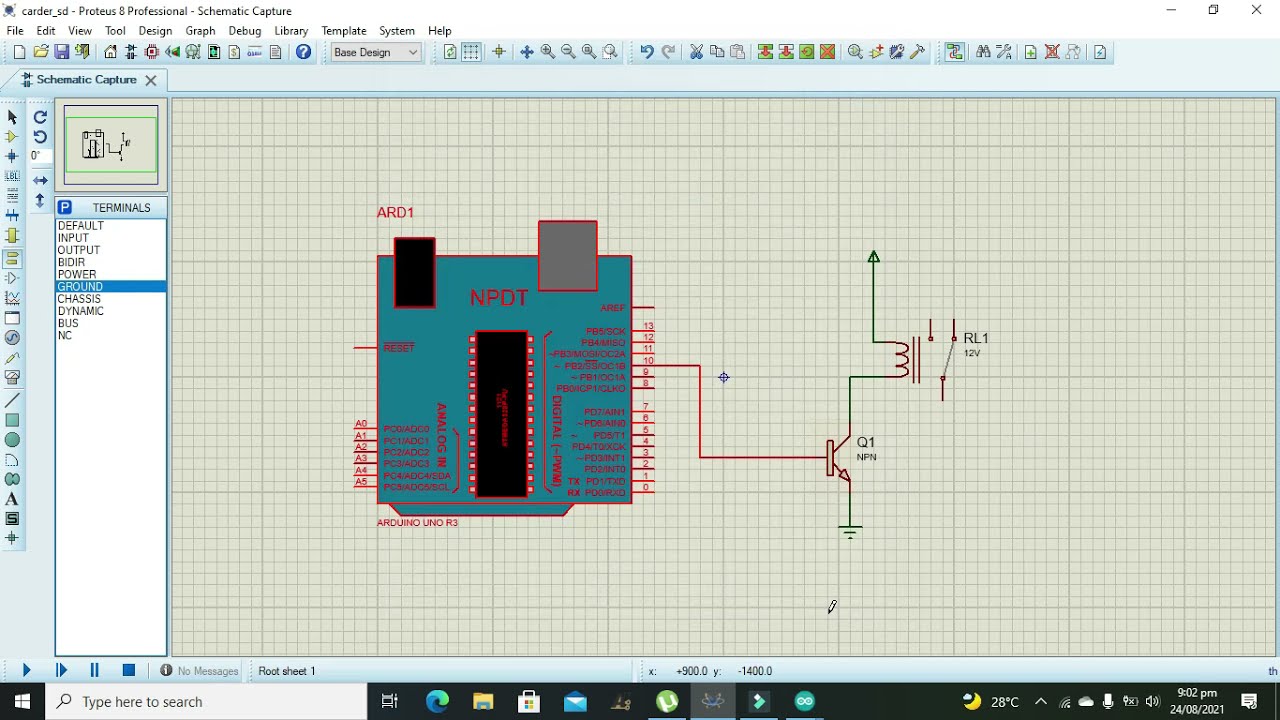
simulation of relay with arduino UNO in proteus YouTube
A relay is a programmable electrical switch, which can be controlled by Arduino or any micro-controller. It is used to programmatically control on/off the devices, which use the high voltage and/or high current. It is a bridge between Arduino and high voltage devices. WARNING. When you are making projects that are connected to mains voltage.
Arduino Button Relay Arduino Tutorial
Rangkaian relay Arduino memberikan fleksibilitas dan kontrol yang lebih besar terhadap perangkat listrik, membuka peluang untuk berbagai aplikasi kreatif. Dengan menerapkan tips-tips di atas, Anda dapat memastikan bahwa rangkaian tersebut berfungsi dengan optimal dan dapat diandalkan dalam jangka panjang.

Rangkaian Relay Arduino Multichanel Belajar Arduino Tutorial Arduino Anak Kendali
Arduino Robotic Online Individual Classes (via skype) with Practical Explanations, Contact me on: [email protected] a lamp using a Relay with Arduin.
Arduino Belajar Membuat Rangkaian Relay Module 1 Channel Dengan Proteus Vrogue
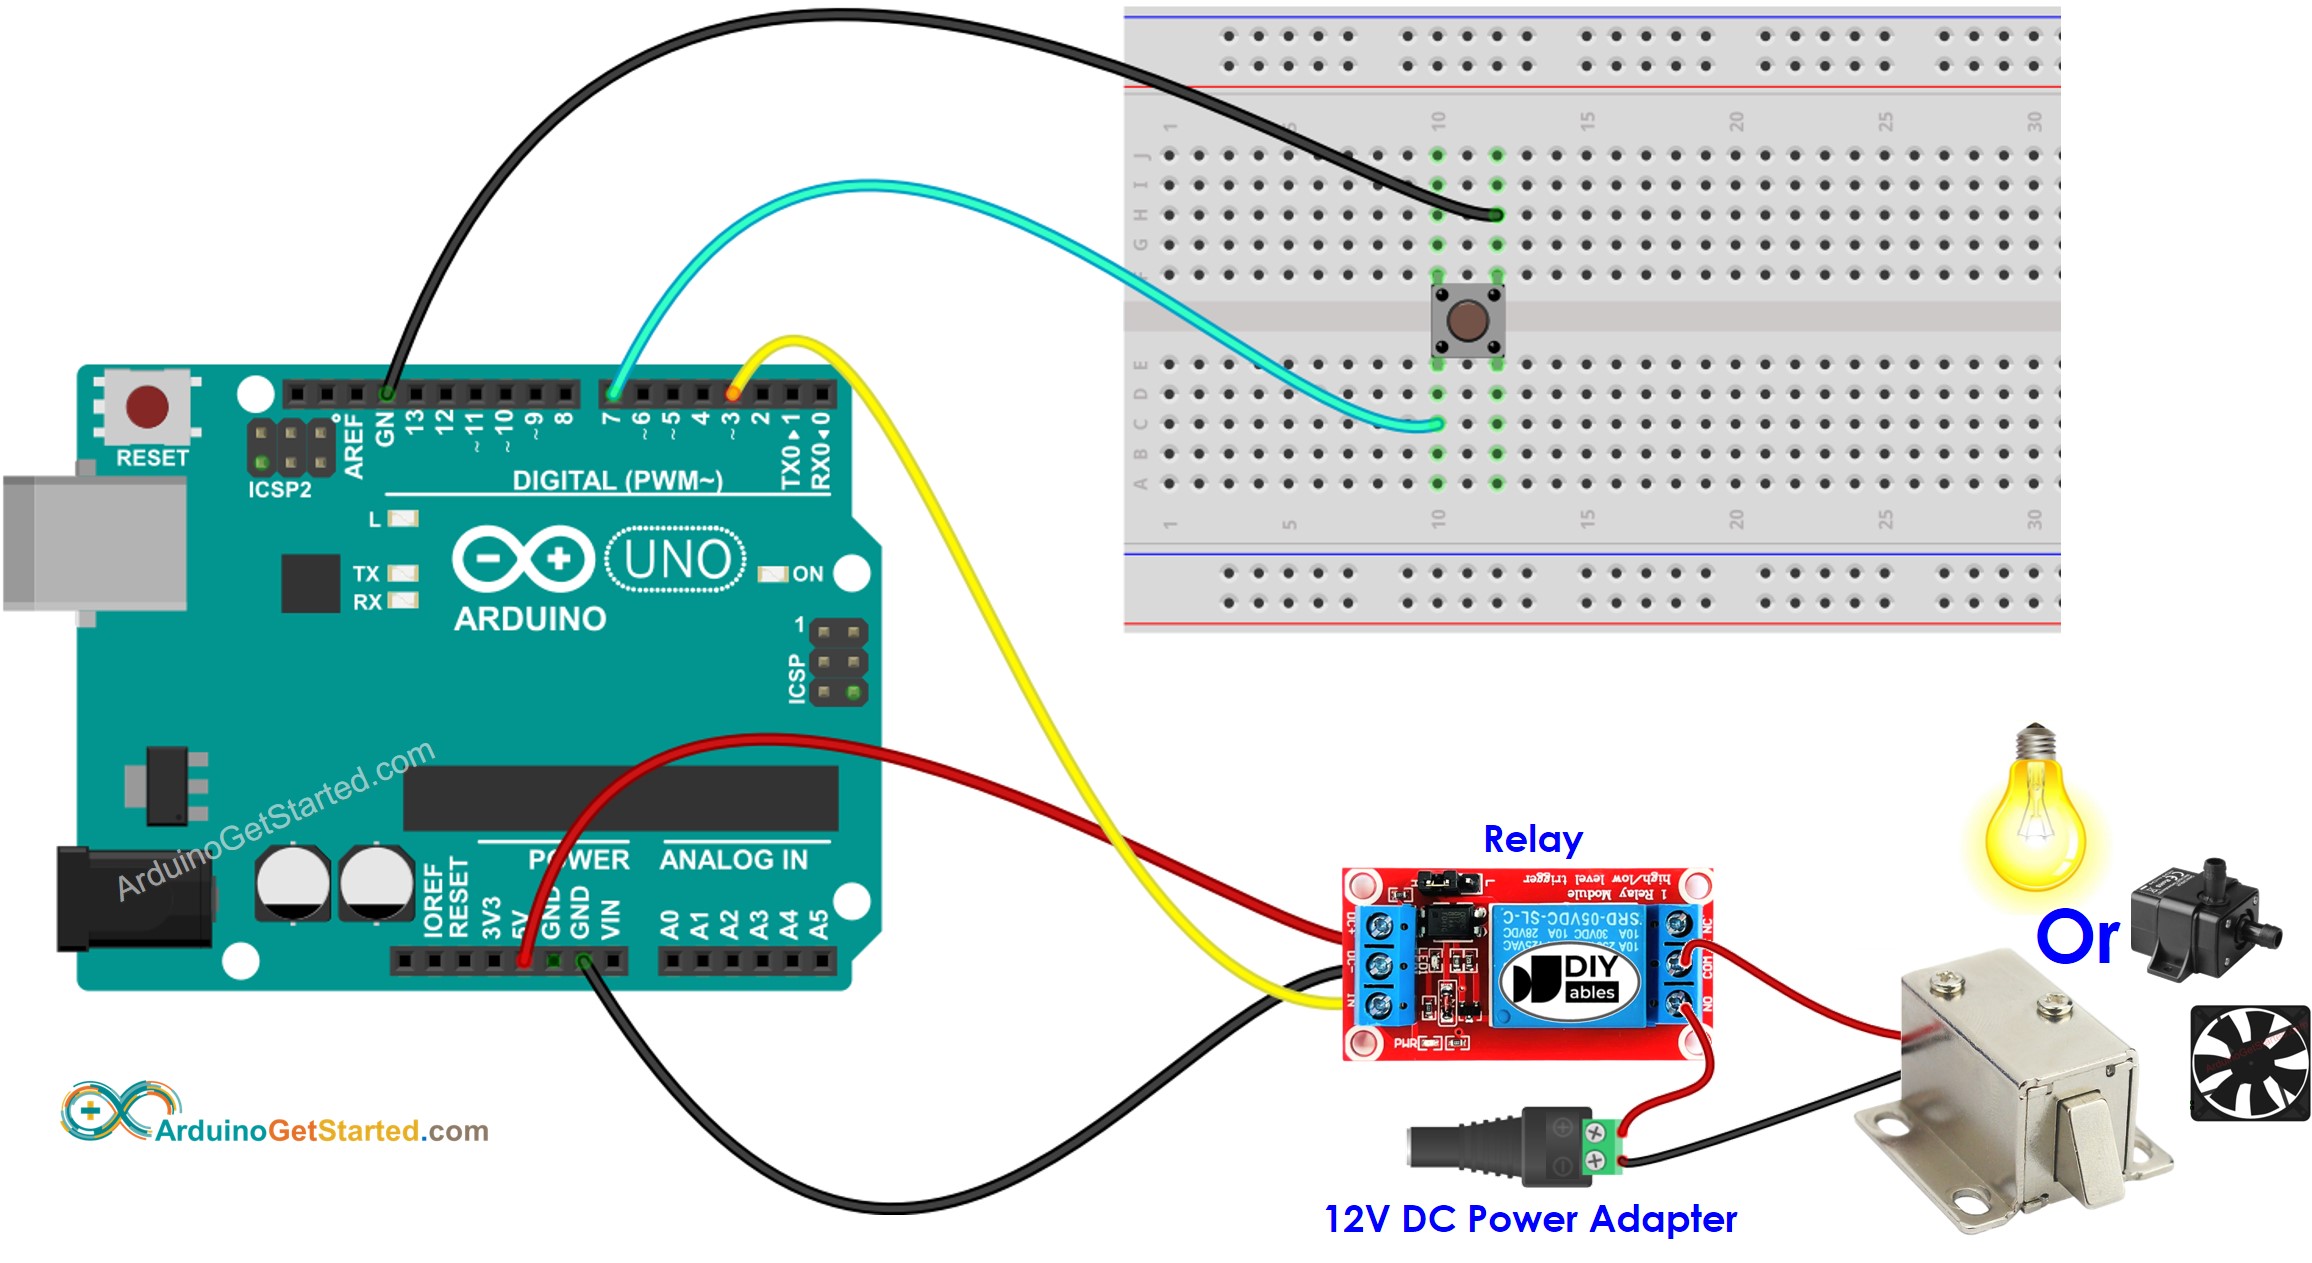
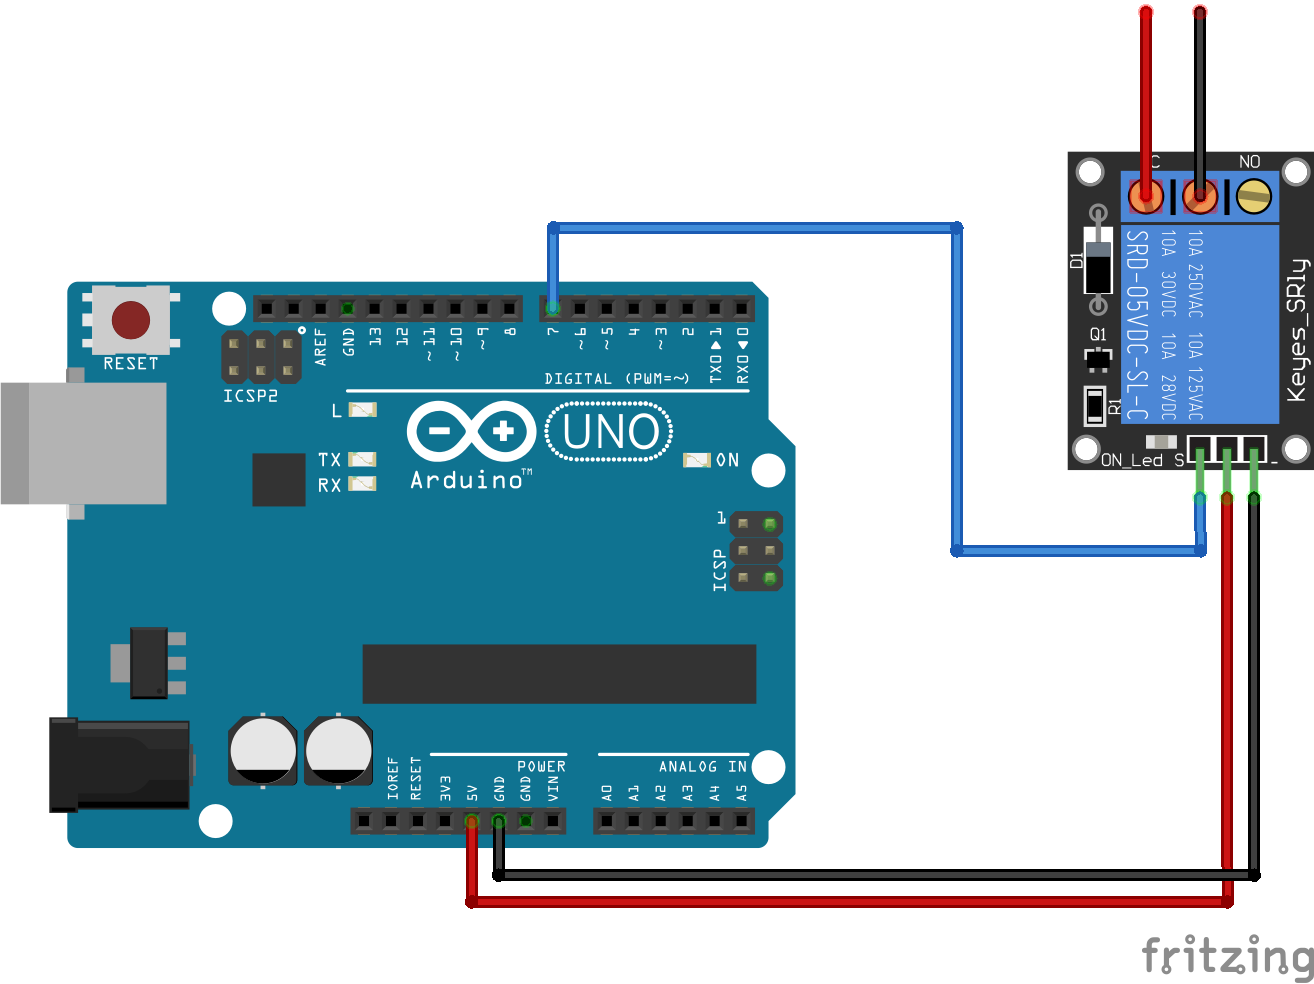
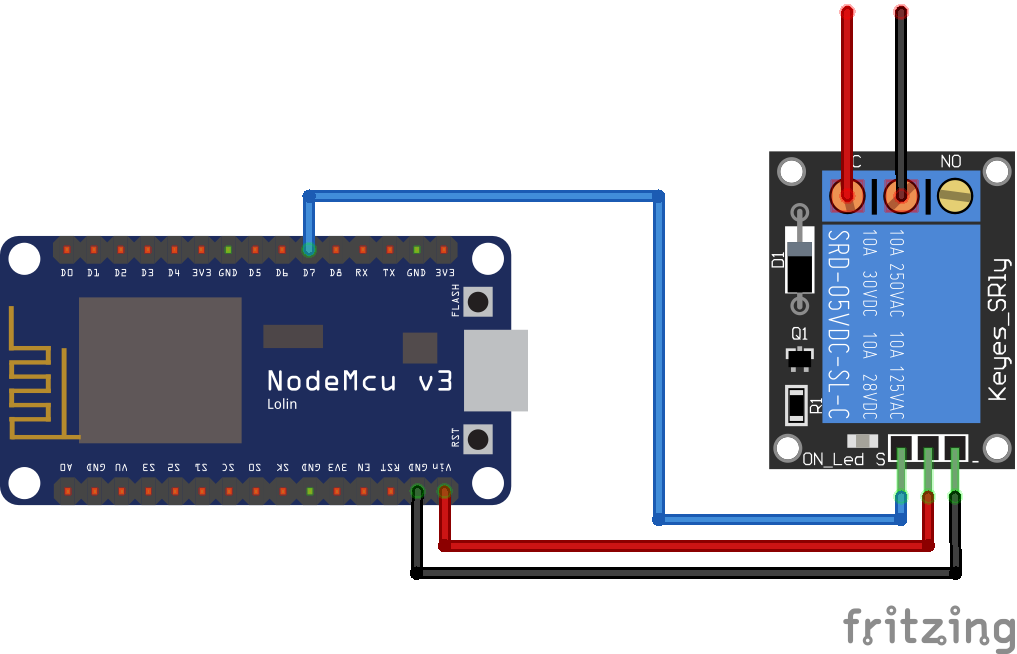
Step 1: Wiring Arduino and the relay board. 1) Take a jumper (Dupont cable) and connect one end to PIN 7 of Arduino. 2) Connect the other end of the jumper to the S PIN on the relay module. The connection will look like the image below. 3) Make a connection between Arduino 5 V pin and the (+) PIN on the relay module.
Relay Tutorial for Arduino, ESP8266 and ESP32
Working is simple, we need to make the RELAY Pin (PIN A0) high to make the Relay module ON and make the RELAY pin low to turn off the Relay Module. The AC light will also turn on and off according to Relay. We just programmed the Arduino to make the Relay Pin (A0) High and Low with a delay of 1 second: void loop() {. digitalWrite(relay, HIGH);
Relay Tutorial for Arduino, ESP8266 and ESP32
In this tutorial, we will test out the four relays on board the Arduino 4 Relays Shield. This shield is a great addon for the Arduino UNO board, as it has four relays capable of handling loads up to 48V. To control the relays, we need to use the following pins: Relay 1 - pin 4. Relay 2 - pin 7. Relay 3 - pin 8. Relay 4 - pin 12.
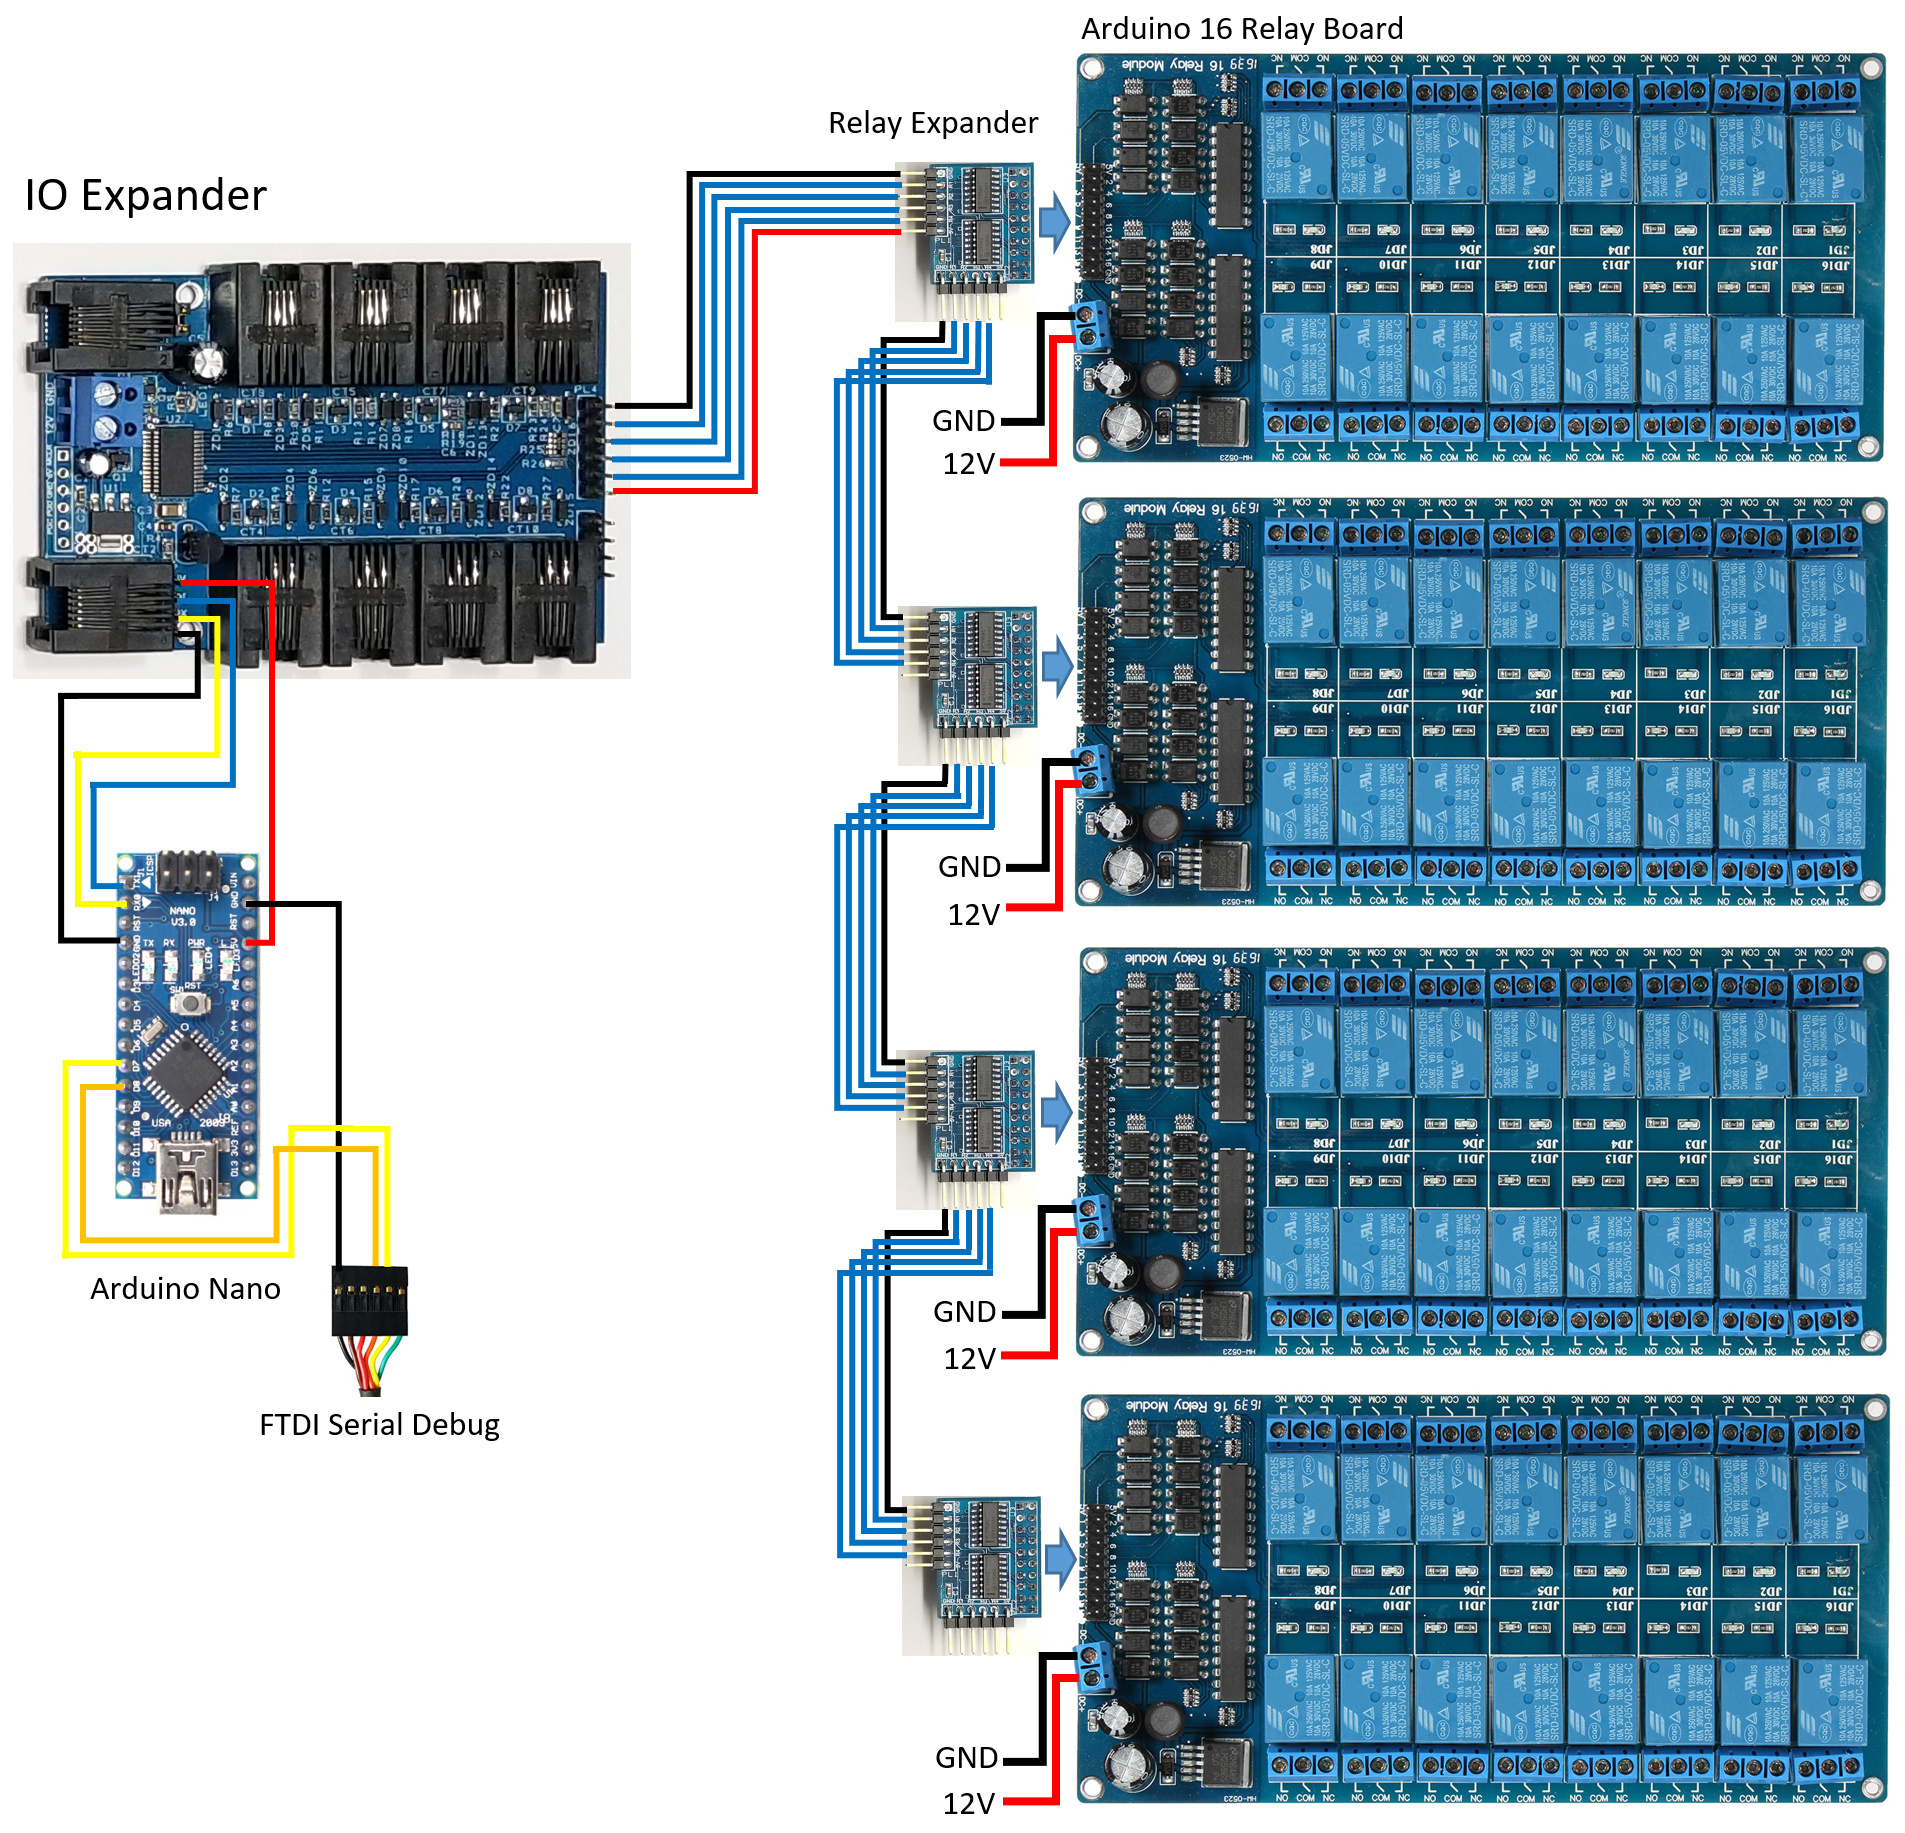
Control Up to 65,280 Relays with Your Arduino! Arduino Project Hub
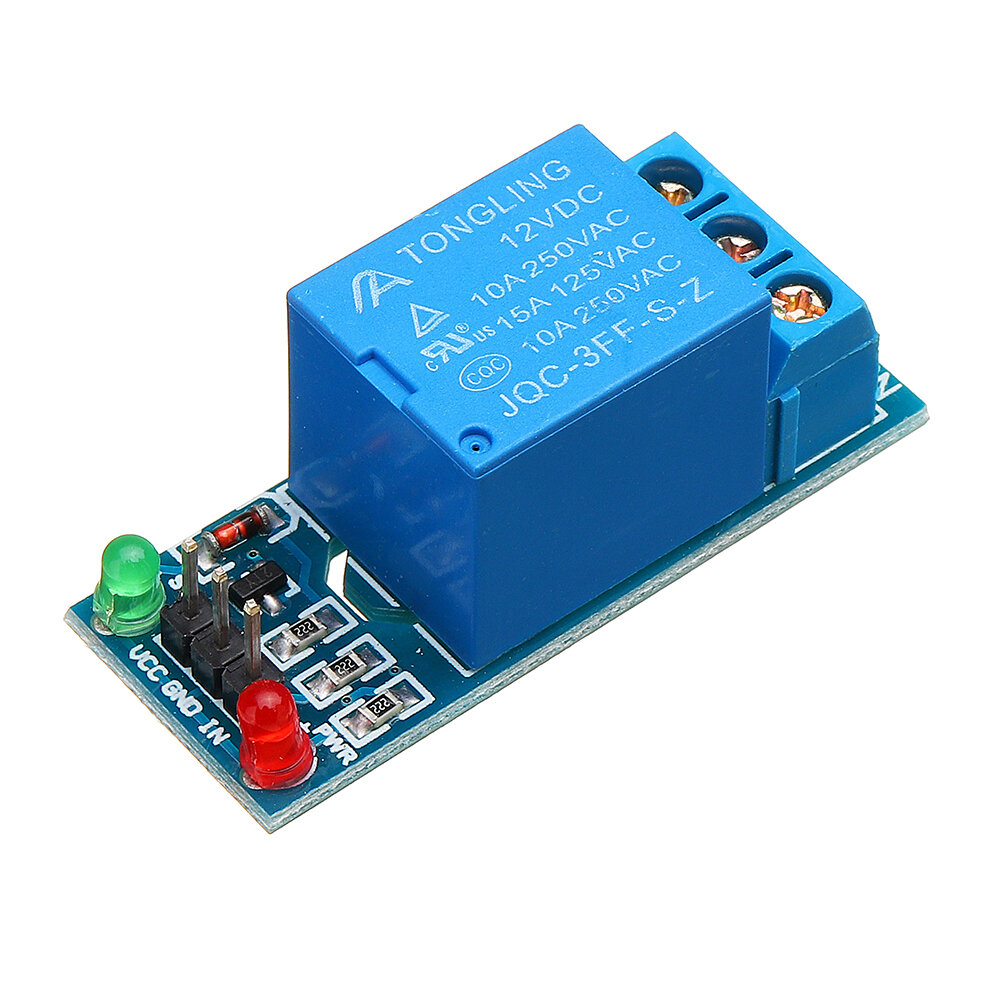
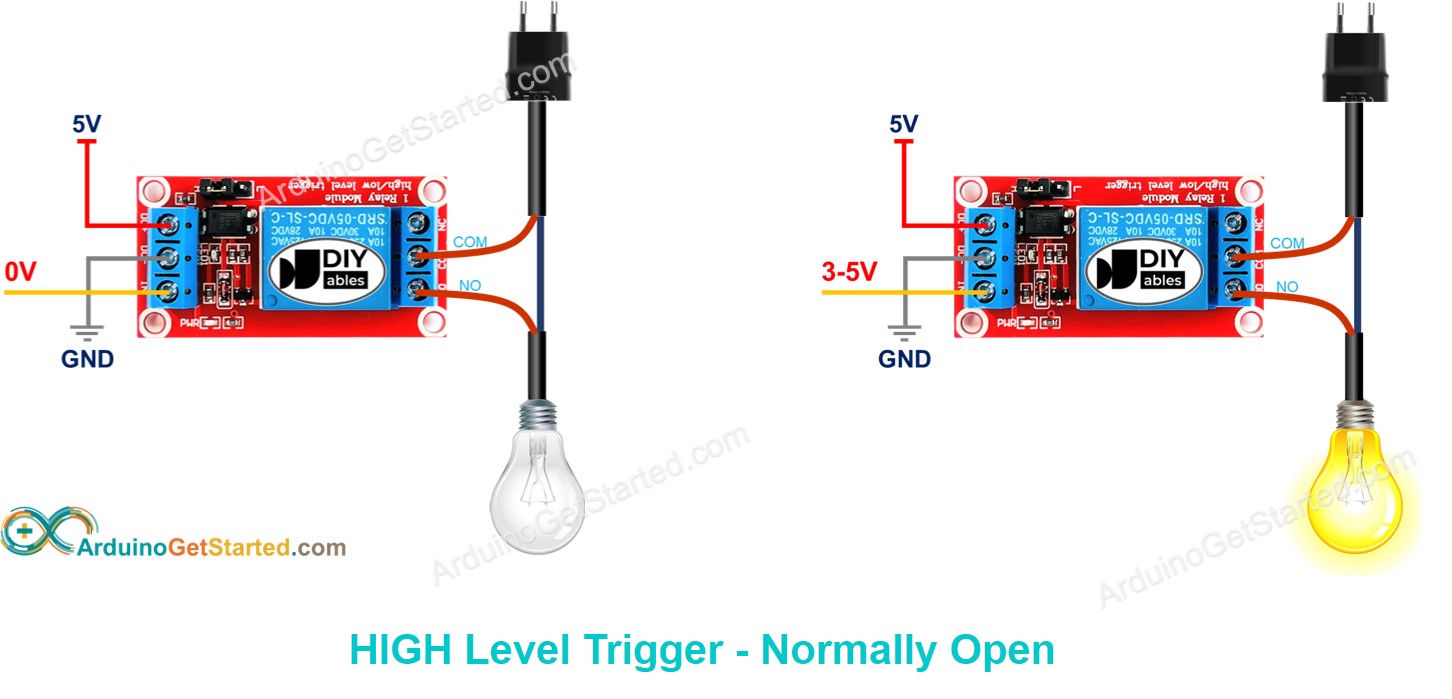
NO: Normally open 120-240V terminal. C: Common terminal. Ground: Connects to the ground pin on the Arduino. 5V Vcc: Connects the Arduino's 5V pin. Signal: Carries the trigger signal from the Arduino that activates the relay. Inside the relay is a 120-240V switch that's connected to an electromagnet. When the relay receives a HIGH signal at.

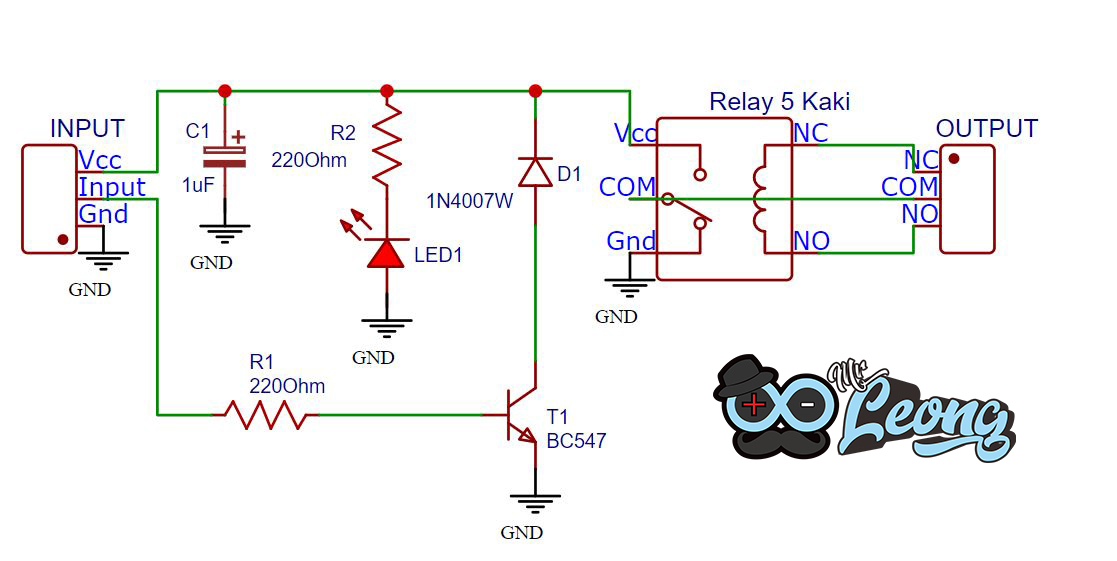
Rangkaian Modul Relay 5v 1 Channel Mr Leong
A 4-channel relay module is a combination of 4 relays on a single board. A 4-channel relay module vs 4 x 1-channel relay modules: A 4-channel relay module has simpler wiring. A 4-channel relay module uses less space. A 4-channel relay module is cheaper. The programming is the same.
Arduino Belajar Membuat Rangkaian Relay Module 1 Channel Dengan Proteus Vrogue
Quick Steps. Connect Arduino to PC via USB cable. Open Arduino IDE, select the right board and port. Copy the above code and open with Arduino IDE. Click Upload button on Arduino IDE to upload code to Arduino. Press and keep pressing the button several seconds. See the change of relay's state.
Arduino Relay Arduino Tutorial Arduino Getting Started
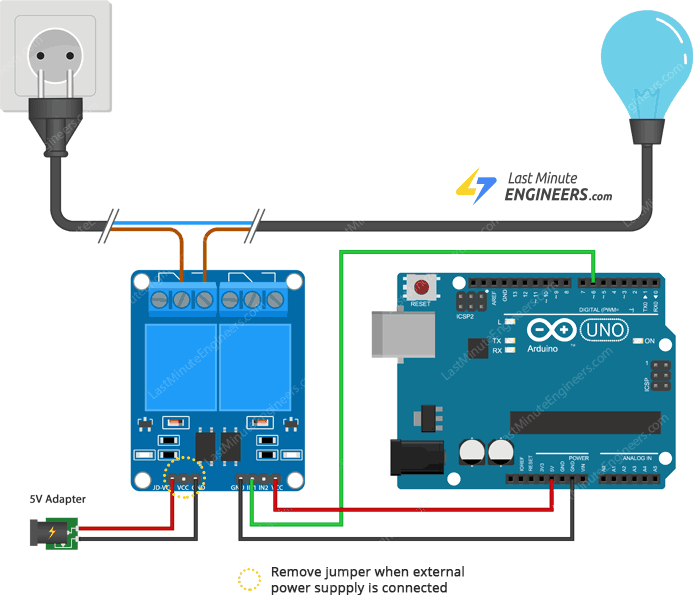
Two-Channel Relay Module Hardware Overview. The two-channel relay module is designed to allow your Arduino to control two high-powered devices. It has two relays, each with a maximum current rating of 10A at 250VAC or 30VDC. Modules with one, four, and eight channels are also available.

Arduino Relay Wiring
Tutorial cara mengakses relay menggunakan arduino Uno. Bahan yang perlu dipersiapkan antara lain : Arduino Uno. Komputer + Software IDE Arduino. Module relay tipe NO 5v - 250 Vac. Lampu 220 Vac. Breadboard. Kabel Jumper. Pada tutorial ini yang digunakan yaitu module yang single, seperti ini.
How To Control A Relay With Arduino Bastian Coutionizies
Modul relay 4 channel umumnya digunakan sebagai saklar penghubung empat sambungan di dalam suatu rangkaian. Cara menggunakan relay Arduino Yaitu dengan menghubungkannya dua kabel yang ingin disambungkan pada port COM dan NO atau NC. Macam macam relay dan gambarnya Sudah disajikan secara lengkap di atas, mohon untuk melihat pada bagian gambar.

Arduino Belajar Membuat Rangkaian Relay Module 1 Channel dengan Proteus YouTube
Arduino 2 Channel Relay: This instructable is for connecting your Arduino to a 2 Channel relay module and using your sketch to control the switches. I bought the 2 Relay Module on eBay (for $9.50) to drive a couple of 240V parts (a vacuum cleaner and a rotary engraving tool…

Cara Membuat Modul Relay Arduino 5V dengan BC548 YouTube
Because UID is usually not printed on RFID/NFC tag, The first step we need to do is to find out the tag's UID. This can be done by: Copy the above code and open with Arduino IDE. Click Upload button on Arduino IDE to upload code to Arduino. Open Serial Monitor. Tap an RFID/NFC tag on RFID-RC522 module. Get UID on Serial Monitor.

Arduino Relay for Beginners Control HighVoltage Circuits NerdyTechy
The Arduino's 5V pin will be connected to the Vcc pin of the module and the pin number 7 to the In1 input pin for controlling the relay. Now for the HIGH Voltage part we need a power plug, a socket and a cable with two wires. One of the two wires will be cut and connected to the common and the normally open pin of the module output connector.
